Airbender
Agentic Performance Management for Production AI
Airbender Client Demo App
Wanna see the Airbender Dashboard in action but haven’t gotten around to implementing your own AI solution? After setting up your Account in the Airbender Dashboard (Hosted) you can try AI requests using our Client Demo.
Getting Started
You will need:
OpenAI and/or Anthropic API Keys saved to your .env file.
For Open AI API key with Credits visit https://platform.openai.com/signup
For Anthropic API key with Credits visit https://console.anthropic.com/dashboard
A Product Key from Airbender Dashboard
Get Started:
Clone or Fork Airbender and install dependencies (if you haven’t already):
git clone git@github.com:rangle/airbender.git
cd ./airbender
npm install
In the client demo directory (apps/client-demo/), create a .env.local file:
For hosted Airbender Dashboard:
AIRBENDER_API_BASE_URL=http://app.airbender.io/api/v1
OPENAI_API_KEY="[The Key You Created At Open AI]"
ANTHROPIC_API_KEY="[The Key You Created At Anthropic]"
For local development (if running dashboard locally):
AIRBENDER_API_BASE_URL=http://localhost:4200/api/v1
OPENAI_API_KEY="[The Key You Created At Open AI]"
ANTHROPIC_API_KEY="[The Key You Created At Anthropic]"
Run the Client Demo
npm run serve:clientDemo
navigate to the Client Demo in your Browser: http://localhost:3000
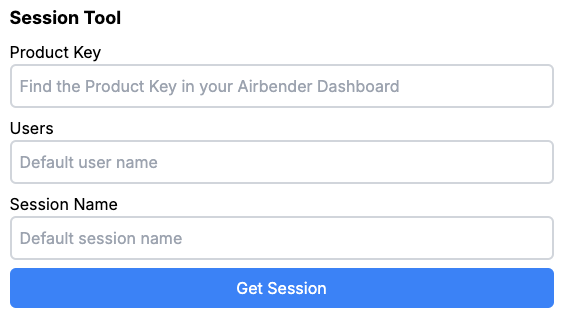
Product Key: Copy your Product Key from the Airbender Dashboard
Users: This is any text, and simply aids finding your Query later
Session Name: More text to help you group your Queries.
Click Get Session
this connects to the Airbender Dashboard, creates a new Session and returns all the Control Points for the Active Config
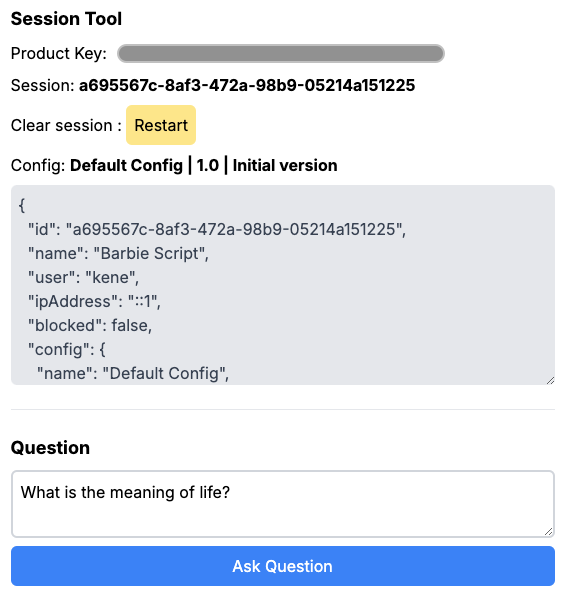
Confirm your Product Key, note your Session Key and Config.
If you have multiple Control Points setup in the Airbender Dashboard, you should see a Selector which allows you to choose which Control Point will govern the next request.
Submit a Question by editing the pre-populated question or submitting as is.
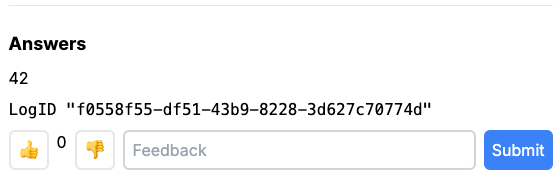
If the LLM returns a response, Airbender will add a Log ID and provides a method to add user Feedback. In this example, you have the option to like (+1) or dislike (-1) and/or add a comment.
interact with the Feedback form, then view the results in the Dashboard.

This Screenshot of the Airbender Dashboard shows the 2 Sessions created for this Demo.
In the Response widget, you see the 2 Negative Feedback clicks. Under Recent Flags, you see the Session (clickable) with the User ID I setup in the Client as well as the Total Feedback items for that Session.
Happy Prompting!